实现多数据源配置及动态切换
发表于更新于
字数总计:4.1k阅读时长:18分钟 上海
实现多数据源配置及动态切换
xukun实现多数据源配置及动态切换
背景
最近在MySQL大体量数据冷热归档项目的开发过程中,需要从8+数据源的不同业务库(源库、归档库)中,对数据进行迁移操作,动态查询新的源库数据源信息并切换到该数据源所迁移的归档库做相应的查询、插入操作,翻阅了网上很多资料都是简单的对多数据源的整合,并没有涉及到多数据源配置及动态切换的案例
目标

在迁移配置表中,根据source_datasource、target_datasource字段在代码中动态切换对应的数据源信息,将源表数据迁移至归档表数据
详细实现
方案一
1、pom文件配置
项目所需的依赖
1
2
3
4
5
6
7
8
9
10
11
12
13
14
15
16
17
18
19
20
21
22
23
24
25
26
27
28
29
30
31
32
33
34
35
36
37
38
39
|
<dependency>
<groupId>org.springframework.boot</groupId>
<artifactId>spring-boot-starter-web</artifactId>
</dependency>
<dependency>
<groupId>org.springframework.boot</groupId>
<artifactId>spring-boot-starter-aop</artifactId>
</dependency>
<dependency>
<groupId>com.alibaba</groupId>
<artifactId>druid-spring-boot-starter</artifactId>
<version>1.2.8</version>
</dependency>
<dependency>
<groupId>org.mybatis.spring.boot</groupId>
<artifactId>mybatis-spring-boot-starter</artifactId>
<version>2.2.2</version>
</dependency>
<dependency>
<groupId>mysql</groupId>
<artifactId>mysql-connector-java</artifactId>
<version>5.1.49</version>
</dependency>
<dependency>
<groupId>org.projectlombok</groupId>
<artifactId>lombok</artifactId>
<optional>true</optional>
</dependency>
<dependency>
<groupId>org.springframework.boot</groupId>
<artifactId>spring-boot-starter-test</artifactId>
<scope>test</scope>
</dependency>
|
2、yml文件配置
可以根据自己的需求对相应数据源进行修改
1
2
3
4
5
6
7
8
9
10
11
12
13
14
15
16
17
18
19
20
21
22
23
24
25
26
27
28
29
30
31
32
33
34
35
36
37
38
39
40
41
42
43
44
45
46
47
48
49
50
51
52
53
54
55
56
57
58
59
60
61
62
63
64
65
66
67
68
| server:
port: 8848
spring:
application:
name: archive
datasource:
druid:
type: com.alibaba.druid.pool.DruidDataSource
archive:
url: jdbc:mysql://127.0.0.1:3306/migration_config?useUnicode=true&characterEncoding=utf8&useSSL=false
username: xx
password: xxx
driver-class-name: com.mysql.cj.jdbc.Driver
business:
url: jdbc:mysql://127.0.0.1:3306/test_business?useUnicode=true&characterEncoding=utf8&useSSL=false
username: user
password: password
driver-class-name: com.mysql.cj.jdbc.Driver
cn6:
url: jdbc:mysql://127.0.0.1:3306/test_cn6?useUnicode=true&characterEncoding=utf8&useSSL=false
username: user
password: password
driver-class-name: com.mysql.cj.jdbc.Driver
user:
url: jdbc:mysql://127.0.0.1:3306/test_user?useUnicode=true&characterEncoding=utf8&useSSL=false
username: user
password: password
driver-class-name: com.mysql.cj.jdbc.Driver
bsap:
url: jdbc:mysql://127.0.0.1:3306/test_bsap?useUnicode=true&characterEncoding=utf8&useSSL=false
username: user
password: password
driver-class-name: com.mysql.cj.jdbc.Driver
cloud:
url: jdbc:mysql://127.0.0.1:3306/test_local_cloud?useUnicode=true&characterEncoding=utf8&useSSL=false
username: user
password: password
driver-class-name: com.mysql.cj.jdbc.Driver
log:
url: jdbc:mysql://127.0.0.1:3306/pro_log_business?useUnicode=true&characterEncoding=utf8&useSSL=false
username: user
password: password
driver-class-name: com.mysql.cj.jdbc.Driver
tsp:
url: jdbc:mysql://127.0.0.1:3306/test_tsp?useUnicode=true&characterEncoding=utf8&useSSL=false
username: user
password: password
driver-class-name: com.mysql.cj.jdbc.Driver
ota:
url: jdbc:mysql://127.0.0.1:3306/test_ota?useUnicode=true&characterEncoding=utf8&useSSL=false
username: user
password: password
driver-class-name: com.mysql.cj.jdbc.Driver
sim:
url: jdbc:mysql://127.0.0.1:3306/test_sim?useUnicode=true&characterEncoding=utf8&useSSL=false
username: user
password: password
driver-class-name: com.mysql.cj.jdbc.Driver
etc:
url: jdbc:mysql://127.0.0.1:3306/test_etc?useUnicode=true&characterEncoding=utf8&useSSL=false
username: user
password: password
driver-class-name: com.mysql.cj.jdbc.Driver
fuelmanage:
url: jdbc:mysql://127.0.0.1:3306/test_fuelmanage?useUnicode=true&characterEncoding=utf8&useSSL=false
username: user
password: password
driver-class-name: com.mysql.cj.jdbc.Driver
|
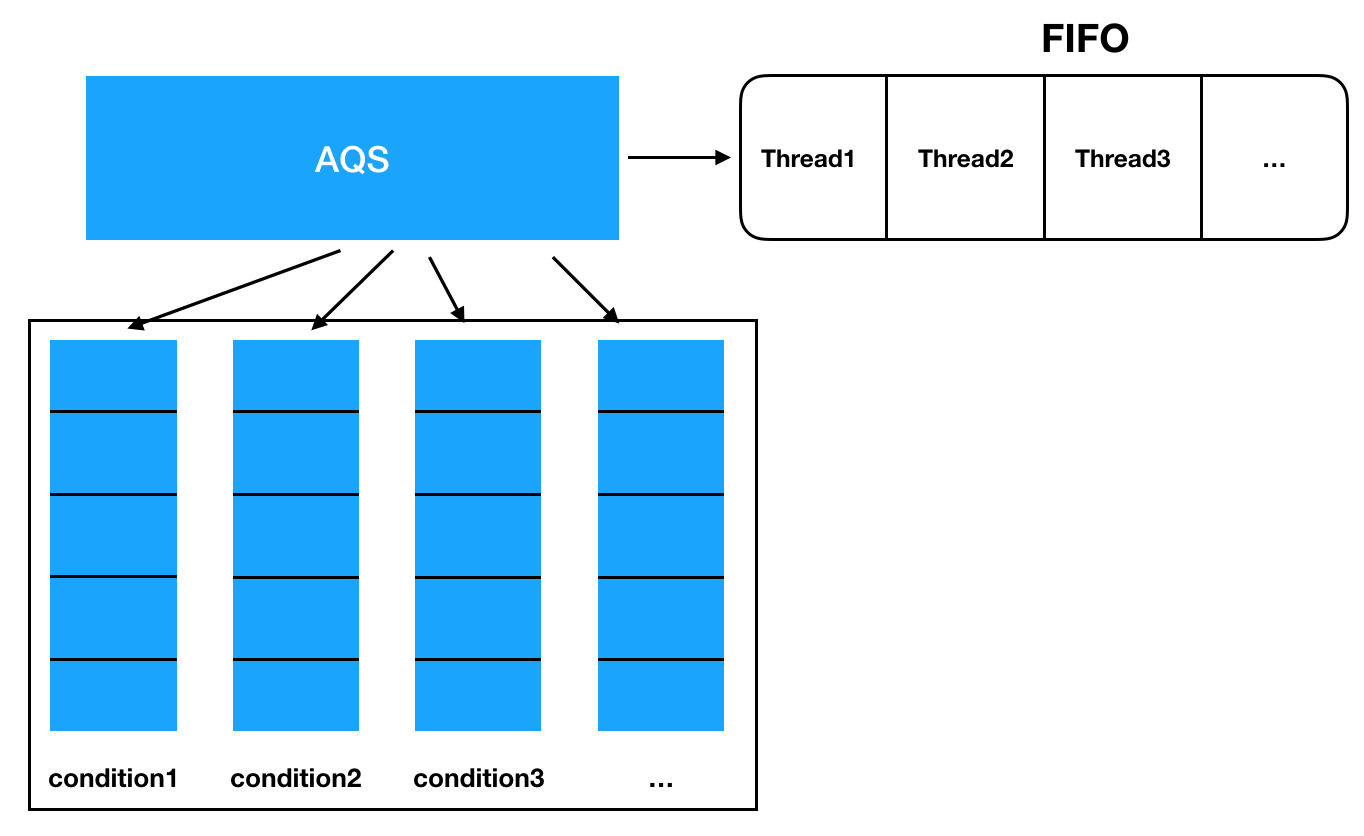
3、基于AbstractRoutingDataSource的数据源切换
在spring中有一个抽象类AbstractRoutingDataSource类,通过这个类可以实现动态数据源切换。 下面对AbstractRoutingDataSource类进行简单说明:
1
2
3
4
5
6
7
8
9
10
11
12
13
14
15
16
17
18
19
20
21
22
23
24
25
26
27
28
29
30
31
32
33
34
35
36
37
38
39
40
41
42
43
44
45
46
47
48
49
50
51
52
53
54
55
56
57
58
59
60
61
62
63
64
65
66
67
68
69
70
71
72
73
74
75
76
77
78
79
80
81
82
83
84
| public abstract class AbstractRoutingDataSource extends AbstractDataSource implements InitializingBean {
@Nullable
private Map<Object, Object> targetDataSources;
@Nullable
private Object defaultTargetDataSource;
private boolean lenientFallback = true;
private DataSourceLookup dataSourceLookup = new JndiDataSourceLookup();
@Nullable
private Map<Object, DataSource> resolvedDataSources;
@Nullable
private DataSource resolvedDefaultDataSource;
public void afterPropertiesSet() {
if (this.targetDataSources == null) {
throw new IllegalArgumentException("Property 'targetDataSources' is required");
} else {
this.resolvedDataSources = CollectionUtils.newHashMap(this.targetDataSources.size());
this.targetDataSources.forEach((key, value) -> {
Object lookupKey = this.resolveSpecifiedLookupKey(key);
DataSource dataSource = this.resolveSpecifiedDataSource(value);
this.resolvedDataSources.put(lookupKey, dataSource);
});
if (this.defaultTargetDataSource != null) {
this.resolvedDefaultDataSource = this.resolveSpecifiedDataSource(this.defaultTargetDataSource);
}
}
}
protected Object resolveSpecifiedLookupKey(Object lookupKey) {
return lookupKey;
}
protected DataSource resolveSpecifiedDataSource(Object dataSource) throws IllegalArgumentException {
if (dataSource instanceof DataSource) {
return (DataSource)dataSource;
} else if (dataSource instanceof String) {
return this.dataSourceLookup.getDataSource((String)dataSource);
} else {
throw new IllegalArgumentException("Illegal data source value - only [javax.sql.DataSource] and String supported: " + dataSource);
}
}
public Connection getConnection() throws SQLException {
return this.determineTargetDataSource().getConnection();
}
public Connection getConnection(String username, String password) throws SQLException {
return this.determineTargetDataSource().getConnection(username, password);
}
protected DataSource determineTargetDataSource() {
Assert.notNull(this.resolvedDataSources, "DataSource router not initialized");
Object lookupKey = this.determineCurrentLookupKey();
DataSource dataSource = (DataSource)this.resolvedDataSources.get(lookupKey);
if (dataSource == null && (this.lenientFallback || lookupKey == null)) {
dataSource = this.resolvedDefaultDataSource;
}
if (dataSource == null) {
throw new IllegalStateException("Cannot determine target DataSource for lookup key [" + lookupKey + "]");
} else {
return dataSource;
}
}
@Nullable
protected abstract Object determineCurrentLookupKey();
}
|
4、编写DynamicDataSource类
了解了AbstractRoutingDataSource的大体流程之后我们需要编写DynamicDataSource类继承AbstractRoutingDataSource类并重写抽象方法determineCurrentLookupKey
1
2
3
4
5
6
7
8
9
10
11
12
13
14
15
16
17
18
19
20
21
| public class DynamicDataSource extends AbstractRoutingDataSource {
private Map<Object, Object> defineTargetDataSources;
@Override
protected Object determineCurrentLookupKey() {
return DynamicDataSourceHolder.getDynamicDataSourceKey();
}
public Map<Object, Object> getDefineTargetDataSources() {
return defineTargetDataSources;
}
public void setDefineTargetDataSources(Map<Object, Object> defineTargetDataSources) {
this.defineTargetDataSources = defineTargetDataSources;
}
}
|
5、编写常量类
根据yml文件对应的数据源名称,编写对应的数据源常量类
1
2
3
4
5
6
7
8
9
10
11
12
13
14
15
16
17
18
19
20
21
22
23
24
25
| public class CommonConstant {
public static final String ARCHIVE = "archive";
public static final String BUSINESS = "business";
public static final String USER = "user";
public static final String BSAP = "bsap";
public static final String CN6 = "cn6";
public static final String SIM = "sim";
public static final String ETC = "etc";
public static final String FUELMANAGE = "fuelmanage";
public static final String CLOUD = "cloud";
public static final String LOG = "log";
public static final String TSP = "tsp";
public static final String OTA = "ota";
}
|
6、编写DynamicDataSourceHolder类
DynamicDataSourceHolder类主要是设置当前线程的数据源名称,移除数据源名称,以及获取当前数据源的名称,便于动态切换
1
2
3
4
5
6
7
8
9
10
11
12
13
14
15
16
17
18
19
20
21
22
23
24
25
26
27
28
| public class DynamicDataSourceHolder {
private static final Logger logger = LoggerFactory.getLogger(DynamicDataSourceHolder.class);
private static final ThreadLocal<String> DYNAMIC_DATASOURCE_KEY = new ThreadLocal<>();
public static void setDynamicDataSourceKey(String key) {
DYNAMIC_DATASOURCE_KEY.set(key);
}
public static String getDynamicDataSourceKey() {
String key = DYNAMIC_DATASOURCE_KEY.get();
return (key == null) ? CommonConstant.ARCHIVE : key;
}
public static void removeDynamicDataSourceKey() {
logger.info("移除数据源:{}", DYNAMIC_DATASOURCE_KEY.get());
DYNAMIC_DATASOURCE_KEY.remove();
}
}
|
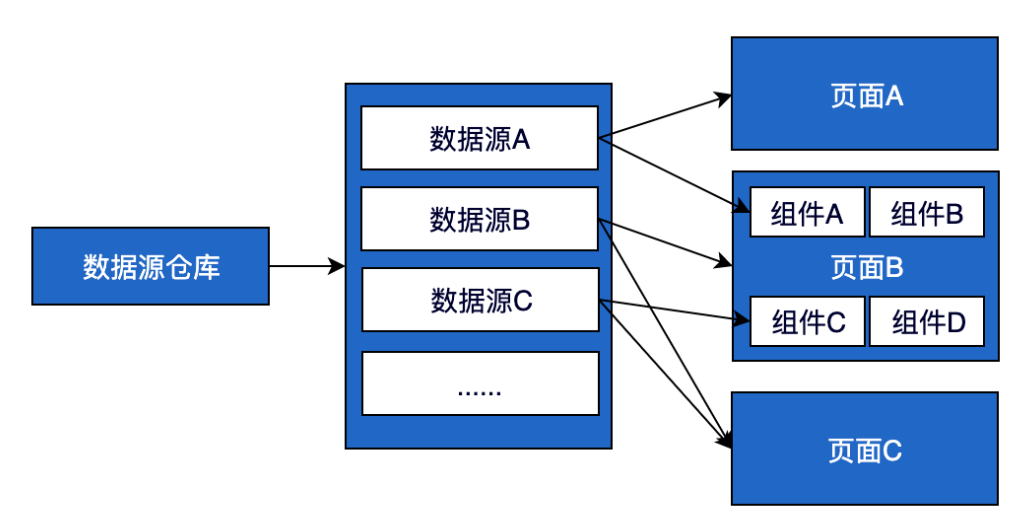
7、编写DruidConfig类
数据源信息配置类,读取数据源配置信息并注册成bean
todo:此处根据需要进行改写
1
2
3
4
5
6
7
8
9
10
11
12
13
14
15
16
17
18
19
20
21
22
23
24
25
26
27
28
29
30
31
32
33
34
35
36
37
38
39
40
41
42
43
44
45
46
47
48
49
50
51
52
53
54
55
56
57
58
59
60
61
62
63
64
65
66
67
68
69
70
71
72
73
74
75
76
77
78
79
80
81
82
83
84
85
86
87
88
89
90
91
92
93
94
95
96
97
98
99
100
101
102
103
104
105
106
107
108
| @Configuration
@MapperScan("com.xxxx.archive.mapper")
public class DruidConfig {
@Bean(name = CommonConstant.ARCHIVE)
@ConfigurationProperties("spring.datasource.druid.archive")
public DataSource archiveDataSource() {
return DruidDataSourceBuilder.create().build();
}
@Bean(name = CommonConstant.BUSINESS)
@ConfigurationProperties("spring.datasource.druid.business")
public DataSource businessDataSource() {
return DruidDataSourceBuilder.create().build();
}
@Bean(name = CommonConstant.USER)
@ConfigurationProperties("spring.datasource.druid.user")
public DataSource userDataSource() {
return DruidDataSourceBuilder.create().build();
}
@Bean(name = CommonConstant.BSAP)
@ConfigurationProperties("spring.datasource.druid.bsap")
public DataSource bsapDataSource() {
return DruidDataSourceBuilder.create().build();
}
@Bean(name = CommonConstant.CN6)
@ConfigurationProperties("spring.datasource.druid.cn6")
public DataSource cn6DataSource() {
return DruidDataSourceBuilder.create().build();
}
@Bean(name = CommonConstant.SIM)
@ConfigurationProperties("spring.datasource.druid.sim")
public DataSource simDataSource() {
return DruidDataSourceBuilder.create().build();
}
@Bean(name = CommonConstant.ETC)
@ConfigurationProperties("spring.datasource.druid.etc")
public DataSource etcDataSource() {
return DruidDataSourceBuilder.create().build();
}
@Bean(name = CommonConstant.FUELMANAGE)
@ConfigurationProperties("spring.datasource.druid.fuelmanage")
public DataSource fuelmanageDataSource() {
return DruidDataSourceBuilder.create().build();
}
@Bean(name = CommonConstant.CLOUD)
@ConfigurationProperties("spring.datasource.druid.cloud")
public DataSource cloudDataSource() {
return DruidDataSourceBuilder.create().build();
}
@Bean(name = CommonConstant.LOG)
@ConfigurationProperties("spring.datasource.druid.log")
public DataSource logDataSource() {
return DruidDataSourceBuilder.create().build();
}
@Bean(name = CommonConstant.TSP)
@ConfigurationProperties("spring.datasource.druid.tsp")
public DataSource tspDataSource() {
return DruidDataSourceBuilder.create().build();
}
@Bean(name = CommonConstant.OTA)
@ConfigurationProperties("spring.datasource.druid.ota")
public DataSource otaDataSource() {
return DruidDataSourceBuilder.create().build();
}
@Bean
@Primary
public DynamicDataSource dynamicDataSource() {
Map<Object, Object> targetDataSources = new HashMap<>(12);
targetDataSources.put(CommonConstant.ARCHIVE, archiveDataSource());
targetDataSources.put(CommonConstant.BUSINESS, businessDataSource());
targetDataSources.put(CommonConstant.USER, userDataSource());
targetDataSources.put(CommonConstant.BSAP, bsapDataSource());
targetDataSources.put(CommonConstant.CN6, cn6DataSource());
targetDataSources.put(CommonConstant.SIM, simDataSource());
targetDataSources.put(CommonConstant.ETC, etcDataSource());
targetDataSources.put(CommonConstant.FUELMANAGE, fuelmanageDataSource());
targetDataSources.put(CommonConstant.CLOUD, cloudDataSource());
targetDataSources.put(CommonConstant.LOG, logDataSource());
targetDataSources.put(CommonConstant.TSP, tspDataSource());
targetDataSources.put(CommonConstant.OTA, otaDataSource());
DynamicDataSource dynamicDataSource = new DynamicDataSource();
dynamicDataSource.setDefaultTargetDataSource(archiveDataSource());
dynamicDataSource.setTargetDataSources(targetDataSources);
dynamicDataSource.setDefineTargetDataSources(targetDataSources);
dynamicDataSource.afterPropertiesSet();
return dynamicDataSource;
}
}
|
8、实际应用
在需要切换数据源操作的mapper方法前,使用下面的代码进行数据源动态切换
1
| DynamicDataSourceHolder.setDynamicDataSourceKey(config.getTargetDatasource());
|
其中config.getTargetDatasource()为配置表中对应的数据源名称,根据需求进行更改
效果:
9、使用须知
AbstractRoutingDataSource是spring提供的类,其中的setTargetDataSources就是设置全量的数据源,有几个数据源,就把这几个存入一个Map,打包放进这个接口。但是要调用一下afterPropertiesSet方法,刷新一下,否则不生效
方案二(踩坑版)
在方案一实现之前,尝试使用dynamic-datasource这款插件实现多数据源配置
优点:
- 在需要切换的实现类/mapper接口中,直接调用@DS注解就可以操作不同数据源,无需额外配置
- 提供@DSTransaction注解,可以实现在事务内的数据源切换
缺点:
1、pom文件配置
在pom.xml中加入以下依赖引入dynamic-datasource包:
版本号可以自己查看
1
2
3
4
5
6
|
<dependency>
<groupId>com.baomidou</groupId>
<artifactId>dynamic-datasource-spring-boot-starter</artifactId>
<version>3.6.1</version>
</dependency>
|
2、yml文件配置
在Spring Boot配置文件中加入以下多数据源配置:
1
2
3
4
5
6
7
8
9
10
11
12
13
14
15
16
17
18
19
20
21
22
23
24
25
26
27
28
29
30
31
32
33
34
35
36
37
38
39
40
41
42
43
44
45
46
47
48
49
50
51
52
53
54
55
56
57
58
59
60
61
62
63
64
65
66
67
68
69
70
| server:
port: 8848
spring:
application:
name: archive
datasource:
dynamic:
primary: archive
datasource:
archive:
url: jdbc:mysql://127.0.0.1:3306/migration_config?useUnicode=true&characterEncoding=utf8&useSSL=false
username: xx
password: xxx
driver-class-name: com.mysql.cj.jdbc.Driver
business:
url: jdbc:mysql://127.0.0.1:3306/test_business?useUnicode=true&characterEncoding=utf8&useSSL=false
username: user
password: password
driver-class-name: com.mysql.cj.jdbc.Driver
cn6:
url: jdbc:mysql://127.0.0.1:3306/test_cn6?useUnicode=true&characterEncoding=utf8&useSSL=false
username: user
password: password
driver-class-name: com.mysql.cj.jdbc.Driver
user:
url: jdbc:mysql://127.0.0.1:3306/test_user?useUnicode=true&characterEncoding=utf8&useSSL=false
username: user
password: password
driver-class-name: com.mysql.cj.jdbc.Driver
bsap:
url: jdbc:mysql://127.0.0.1:3306/test_bsap?useUnicode=true&characterEncoding=utf8&useSSL=false
username: user
password: password
driver-class-name: com.mysql.cj.jdbc.Driver
cloud:
url: jdbc:mysql://127.0.0.1:3306/test_local_cloud?useUnicode=true&characterEncoding=utf8&useSSL=false
username: user
password: password
driver-class-name: com.mysql.cj.jdbc.Driver
log:
url: jdbc:mysql://127.0.0.1:3306/pro_log_business?useUnicode=true&characterEncoding=utf8&useSSL=false
username: user
password: password
driver-class-name: com.mysql.cj.jdbc.Driver
tsp:
url: jdbc:mysql://127.0.0.1:3306/test_tsp?useUnicode=true&characterEncoding=utf8&useSSL=false
username: user
password: password
driver-class-name: com.mysql.cj.jdbc.Driver
ota:
url: jdbc:mysql://127.0.0.1:3306/test_ota?useUnicode=true&characterEncoding=utf8&useSSL=false
username: user
password: password
driver-class-name: com.mysql.cj.jdbc.Driver
sim:
url: jdbc:mysql://127.0.0.1:3306/test_sim?useUnicode=true&characterEncoding=utf8&useSSL=false
username: user
password: password
driver-class-name: com.mysql.cj.jdbc.Driver
etc:
url: jdbc:mysql://127.0.0.1:3306/test_etc?useUnicode=true&characterEncoding=utf8&useSSL=false
username: user
password: password
driver-class-name: com.mysql.cj.jdbc.Driver
fuelmanage:
url: jdbc:mysql://127.0.0.1:3306/test_fuelmanage?useUnicode=true&characterEncoding=utf8&useSSL=false
username: user
password: password
driver-class-name: com.mysql.cj.jdbc.Driver
|
由于这里所有的数据源都是使用的MySQL数据库,因此引入mysql-driver后就不需要写驱动名了,如果说要配置多个不同数据库的数据源就要指定每个数据源的驱动
比如:driver-class-name: org.postgresql.Driver
3、在代码中动态地切换数据源
配置完成后,切换数据源就非常简单了!通过@DS注解即可。
@DS可以注解在方法上或类上,遵循就近原则,方法上注解优先于类上注解
| 注解 |
结果 |
没有@DS |
默认数据源 |
@DS("dsName") |
dsName可以为组名也可以为具体某个库的名称 |
@DS可以用于以下位置切换数据源
4、实现事务
问题:
- 当方法有@Transactional注解时,切换数据源失败
1
2
3
4
5
6
7
8
| ### Error updating database. Cause: java.sql.SQLSyntaxErrorException: Table 'demo_01.t_dynamic_template' doesn't exist
### The error may exist in com/itender/threadpool/mapper/DynamicTemplateMapper.java (best guess)
### The error may involve com.itender.threadpool.mapper.DynamicTemplateMapper.insert-Inline
### The error occurred while setting parameters
### SQL: INSERT INTO t_dynamic_template ( language, language_code, created_time, created_by, created_by_name ) VALUES ( ?, ?, ?, ?, ? )
### Cause: java.sql.SQLSyntaxErrorException: Table 'demo_01.t_dynamic_template' doesn't exist
; bad SQL grammar []; nested exception is java.sql.SQLSyntaxErrorException: Table 'demo_01.t_dynamic_template' doesn't exist] with root cause
java.sql.SQLSyntaxErrorException: Table 'demo_01.t_dynamic_template' doesn't exist
|
分析:
- spring 的@Transactional声明式事务管理时通过动态代理实现的
- @DS注解加到mapper接口、service接口、service方法里都不生效,获取的还是默认的主数据源。猜测是由于spring的aop切面机制导致拦截不到@DS注解,进而不能切换数据源,正确的做法是添加到service实现类或者实现类里具体的方法上
- 在事务方法内调用@DS注解的方法,@DS注解同样不生效,原因是spring只能拦截到最外层方法的@Transactional注解,此时加载该事务的数据源,在事务方法内即使调用了@DS注解的方法,获取的是外层事务的数据源,导致@DS失效
- 在同一个实现类中,一个非DS注解的常规方法里调用@DS注解的方法,同样存在@DS失效的情况,原因同上,是由spring的aop机制导致的,如果确有这种业务需要,可以将该DS注解方法定义在不同的类中,通过bean注入的方式调用,就不会出现这个问题
解决方案:
- 使用@DSTransational注解代替@Transactional
- @DSTransactional 注解功能概述
- @DSTransactional 注解是专门为解决多数据源事务问题而设计的。它可以直接替代 @Transactional 注解,在不改变原有代码结构的基础上,实现多数据源事务的正确管理。该注解内部实现了对数据源切换和事务管理的优化,确保在多数据源操作中事务的一致性和正确性
- 使用 @DSTransactional 注解非常简单。只需在原来使用 @Transactional 的地方替换为 @DSTransactional,并确保项目中引入了相应的依赖。例如,在一个包含主从数据源操作的 Service 方法中,标注 @DSTransactional 后,该方法中的所有数据库操作(涉及不同数据源)将在一个事务中正确执行,并且在出现异常时能够自动回滚所有相关数据源的操作